Creating a New Application
Set up a new application for recovery.
Jump to:
Creating an Application
Launch the Create Application Process
Specify the Application Name and Recovery Point Objective
Specify AWS Accounts and Regions
Connect Arpio To Your AWS Account
Select Application Resources
Creating an Application
Arpio aligns your disaster recovery plans with the applications or workloads you operate in production. For each of your applications that you'd like to setup disaster recovery, you'll define an application in Arpio.
Your first application was set up when your Arpio account was created. You can create as many additional applications as you need.
Launch the Create Application Process
To begin defining a new application, click the "Create new" link under "Applications" in the left-side navigation bar in the Arpio console.
Specify the Application Name and Recovery Point Objective
Each application has a friendly name that is used to represent it in the Arpio console and in reports. You can provide any name you like, but typically you'll use the name by which your organizations knows this workload.
Once you've specified the name, you need to provide the recovery point objective for the application.
Arpio supports real-time RPO replication or snapshot RPO replication from every 15 minutes up to 24 hours.

Specify AWS Accounts and Regions
Arpio works by replicating your AWS infrastructure to another AWS region, and if desired to another AWS account. Here, specify the AWS account and region where this workload currently runs, and the account and region you'd like to recover it to.

Your AWS account number can be found in the drop-down in the upper right corner of the AWS console. It is a 12 digit number, usually hyphenated as XXXX-XXXX-XXXX. You can type it here with or without the hyphens.
While replicating to an alternate AWS account is optional, doing so will give you a defense against disasters where a bad actor compromises your primary AWS account. We recommend you create a new AWS account and do not add it to any existing AWS Organization you may have set up. Minimize the permissions you grant to this account. Only a few people in your organization need access.
Click "Continue" to move to the next page.
Connect Arpio To Your AWS Account
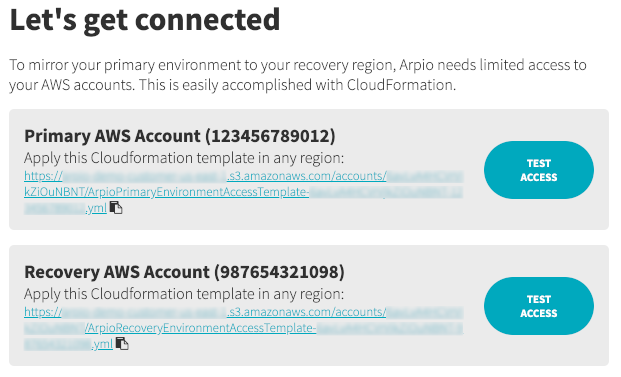
If you haven't previously connected Arpio to the specified AWS account(s), you'll need to do that now. We provide you with CloudFormation templates to make this easy.

Note that Arpio connects to your AWS accounts in accordance with Amazon's best practices for cross-account access. We require limited access to your AWS accounts in order to replicate infrastructure and data within your accounts. At all times, your application data stays within your accounts.
Select Application Resources
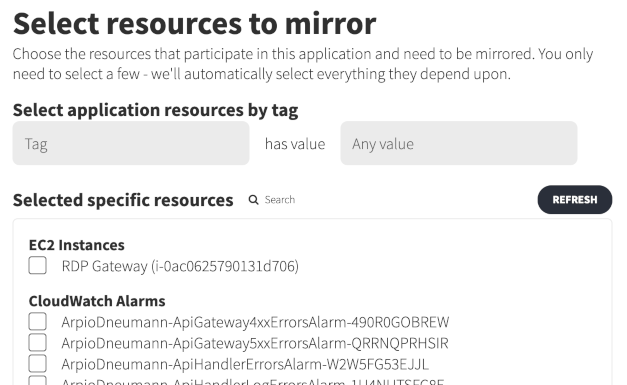
The last step is selecting the AWS resources that comprise your application. You can select resources directly, or you can specify tags that you have applied to those resources. Or, you can do both.
Arpio knows the relationships between your AWS resources, and automatically selects dependee resources for you. You can usually select just a few resources and let Arpio find the rest automatically.
As your application changes over time, Arpio continues to apply these selection rules to find resources for each recovery point. If a selected resource disappears, that resource and anything it depends upon will no longer be included in future recovery points. If your environment is dynamic, you'll probably find that choosing resources by tag is more appropriate.

To select resources by tag, simply type the tag name or use the drop-down to select from the tags that Arpio has discovered. Once a tag name is provided, you can type a value, or use the drop-down to select from the values Arpio has discovered for this tag. You'll notice that matching resources and their dependees are automatically checked in the list below.
You can specify as many tags as you'd like.
To select specific resources, click the check box next to the resources you'd like to include. Dependee resources are automatically checked.
You can mix tag selection and specific resource selection as you see fit. Arpio will create recovery points that include the combination of all resources that match tags, are specifically selected, or are depended upon by other selected resources.
You're Finished!
Once you've selected resources for your application, you're finished. Click the "Finish" button to complete the process of creating your application.
Arpio will now initiate the process of creating the first recovery point and will then apply the first recovery point to the recovery environment, creating the resources that Amazon does not charge for. Resources that cost money won't get created until you execute a test or a recovery. In the meantime, all you'll pay Amazon for is the cost of data transfer and data storage in the recovery environment.
Creating the first recovery point will take several minutes as a full copy of your infrastructure and data is transferred to the recovery environment. Subsequent recovery points are incremental, transferring only what has changed, and will happen faster.