These steps will help you configure Okta and Arpio so your Okta users can access Arpio without supplying new authentication credentials.
Before you begin, open two web browser windows. In the first window, sign in to the Applications page in your Okta Console. In the other, navigate to the Account page in your Arpio Console.
Create a new application in Okta
- In the Okta window, click Create App Integration.
- From the list of options, select SAML 2.0 as the sign-in method and click Next.
- Name your application and select Next to move on to configuring SAML.
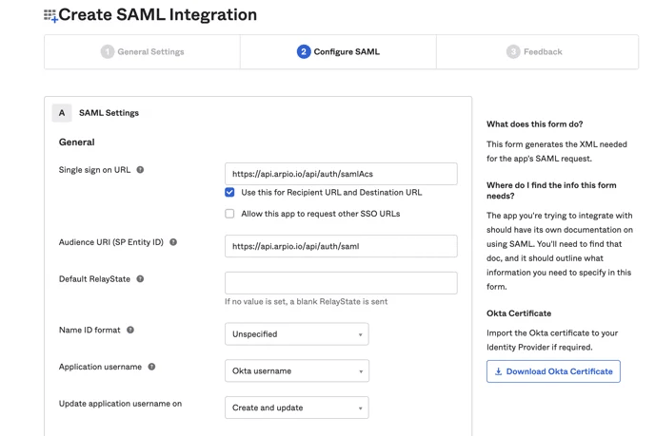
- For the Single Sign On URL use: https://api.arpio.io/api/auth/samlAcs
- To get the Audience URI for your account, go to your Arpio Account page, click Add Identity Provider, and copy the text for “Audience Restriction URI / Entity ID.
- Back in the Okta Console, leave the Default RelayState blank.
- You can keep the defaults for: Name ID format, Application username, and Update application username.
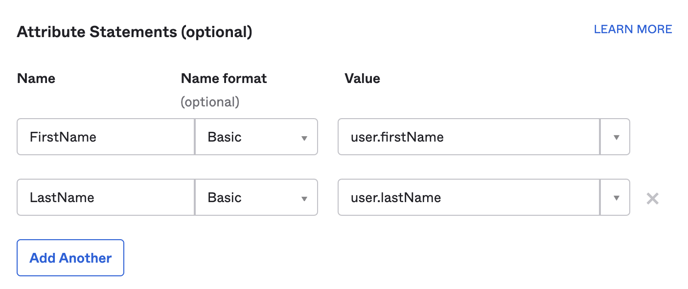
- In the Attribute Statements section, you will create two new Attribute Statements, as follows :
- Name: FirstName Name Format: Basic Value: user.firstName (case sensitive)
- Name: LastName Name Format: Basic Value: user.lastName (case sensitive)
- (Optional) - If you want authorization to occur with your IDP (Okta) then you will want to create a Group Attribute Statement:
- Name: Groups
- Name Format: Unspecified
- Filter: (use a filter that will match the with the groups in Okta that will be used to give your users access to Arpio)

- Click Next
- On the final Feedback step, select I’m an Okta customer adding an internal app.
- Click Finish.
Configure SAML for your new application
After completing set up, you will be dropped on to the Sign On tab of your new application. You should see a notice in the middle of the Settings that SAML 2.0 is not configured until you complete the set up instructions.
To complete set up:
- Click View Setup Instructions.
- Scroll to the bottom of the page and copy the IDP metadata from 1 in the Optional section.

- Navigate back to the Account page in your Arpio console.
- Select Add an Identity Provider.
- Name your SSO application appropriately, then paste the XML from Okta in the Metadata field.
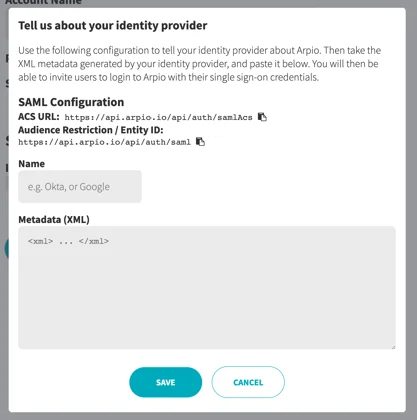
- Click Save.
Congratulations, your Okta integration with Arpio is complete! You can assign your Arpio application to your Okta users individually or in groups.