These steps will help you configure Google Workspace and Arpio so your Google Workspace users can access Arpio without supplying new authentication credentials.
Before you begin, open two web browser windows. In the first window, sign in to the Google Admin page for your Google Workspace. In the other, navigate to the Account page in your Arpio Console.
Create a new application in Google
- In the Arpio Account window, click on ADD IDENTITY PROVIDER, to see your SAML Entity ID, and ACS URL, you will need these later.
- Switch to the Google Admin window. Use the menu on the left to navigate to Apps > Web and mobile apps.
- Open the Add app drop-down menu at the top of the list of apps and choose Add custom SAML app.
- In the App details page, enter a name you choose (like “Arpio”), optionally set a description and an icon, then click Continue.
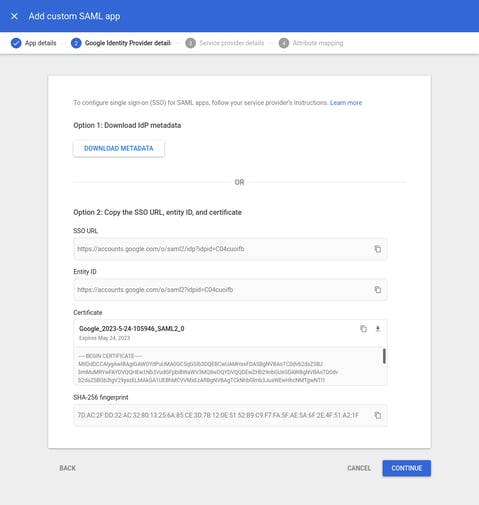
- In the Google Identity Provider details page, click the Download Metadata button and save the file to your computer, then click Continue.
- In the Service provider details page, enter the following information:
- ACS URL: https://api.arpio.io/api/auth/samlAcs
- Entity ID: Paste the value you copied from the Arpio Account page in step 1
- Name ID format: Choose EMAIL
- Name ID: Basic Information > Primary emails
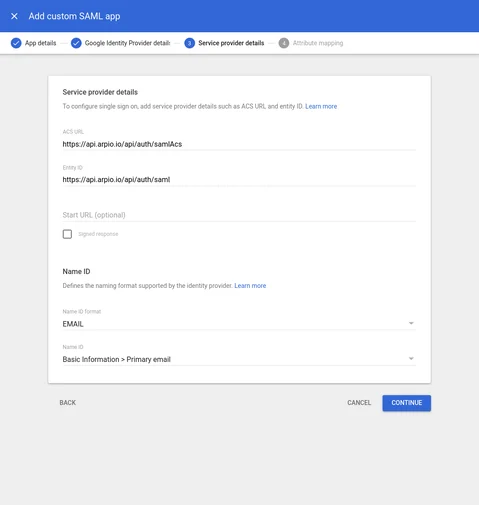
- Click Continue to finish the Service Provider details page.
- In the Attribute mapping page, use the Add mapping button to add two required attributes:
- Map Basic information > First name to the value FirstName
- Map Basic information > Last name to the value LastName
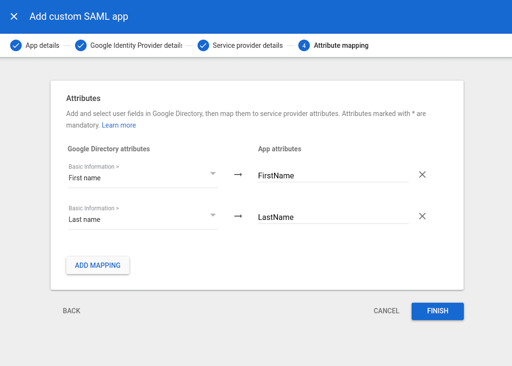
- Click Finish to create the SAML app
Configure your new Google application
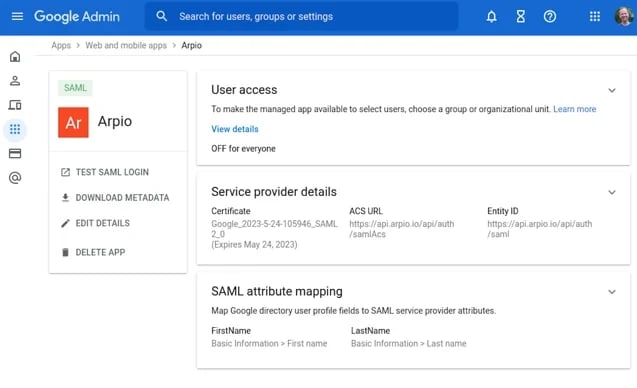
Once you have completed the steps above, Google will show you the SAML app you created.
Apps are created with User access set to OFF for everyone. Change it to a value appropriate for your organization, like ON for everyone, or enabled for certain groups or organizational units.
To finish the integration with Arpio, Open the metadata file you downloaded in step 5 with a text editor and copy the entire contents of the file to your clipboard. You’ll need this value in a later step.
- Switch back to the Arpio Account window and click the Add SAML Identity Provider button
- In the Add a new SAML Identity Provider window that appears, enter the following information:
- Name: A name you choose like “Google Workspace”
- Metadata: Paste the contents of the metadata file that you opened with your text editor
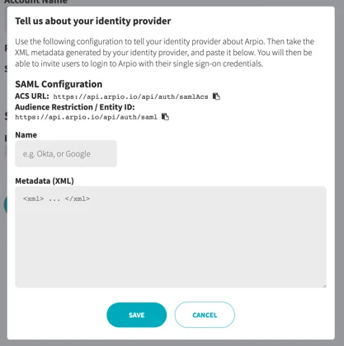
- Click Save
Your Google SAML integration with Arpio is now complete.
Note: Google SAML apps often take several minutes to become fully functional after they are created. If you receive errors authenticating to an app you just created, or to one you recently enabled for your users, wait a few minutes and try again.